Anyone who wanders the cliff tops of Kent in summer can't help but recognise the warm, coconut fragrance of the bright yellow gorse bushes that stand proud against the sea breezes.
But if you thought you need to wait another 6 months for them, there is an old saying that "Gorse is out of flowering season, when kissing is out of fashion"; which should give you a clue to the fact that you should be able to find gorse flowers almost any time of the year.
It makes a wonderful hedgerow wine (or so i've read...and hope to find out for myself), so what better than to take a winter walk along the saxon shore way and see if I can find some this weekend.
If I can get enough, this is the recipe I'll try, a mix of a few recipes i found on line and in a "Booze for Free" book
6 pints (a good carrier bag full) of gorse flowers (though I've seen recipes where you can also throw in any spring flower like dandelion, primrose, etc too)
3lb of sugar
4 pints of water
can of grape concentrate (or throw in a cup of chopped sultanas) - this is basically to add tannins to make it more "winey"
2 oranges (zested and juiced)
tsp Citric Acid
half a cup of black tea (more tanin - optional - leave out if you want it more white winey that rose')
packet of yeast nturient/yeast (champagne yeast best for high alcohol)
put the flowers, sugar, grape juice, tea, orange juice and zest, citric acid in a large sterilised fermenting bucket or big pan (that can be covered)
(don't add the yeast or yeast nutrient at this stage)
boil up the water, and add to the mixture, stir, cover, and leave to steep and cool - make sure it's boiling water to release the flavours, and also to sterilise the mixture to kill of any natural yeasts that you may not want.
once it's cooled to room temp (or a little above) throw in the yeast and yeast nutrient
cover with a breathable cover, and leave to ferment until the fermentation dies down - probably 3-5 days in a reasonably warm house.
once finished, strain it through a sterile piece of muslin, into a demi-john, add the mandatory air lock, and leave in a quiet corner to finish it's ferment and clarifiy (this should be about a month - you'll notice when you no longer hear it bubbling away to itself, and sediment has settled)
depending on how clear you want your wine, you could re-rack it into a clean demi john and leave for another month to clarify further, before bottling.
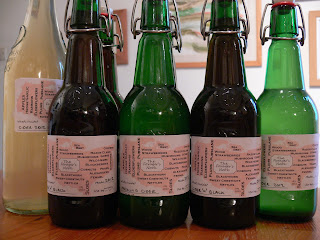
"Re-Fizzing" - bottle it with a spoon of sugar....
right...if you like the taste of it flat...then once bottled, feel free to drink, or keep for later as required.
If you would like to re-energise it and make it sparkling, then make sure you bottle it in swing top strong glass bottles, and add 1 good tea spoon of sugar to each bottle as you bottle it.
leave it to referment in the bottle for another couple of weeks, then chill well, and open carefully for golden yellow, coconut flavoured dry sparkling gorse wine!
Enjoy
Tj@TheForagersNook
Friday, 18 January 2013
Saturday, 10 November 2012
...more cider...this time with instructions.
The last of Sue's apple harvest (best part of 150lb's over the season) freshly juiced and made into Cider.
Someone on twitter asked about how many apples for how much juice for how much cider.
 I get about 1 x 4.5Litre demi-john out of about 20-25lb of apples. you need to only fill the demi-john's 4/5ths full for the initial ferment (otherwise the rising cloud of yeasty bubbles will breach the airlock and cover your carpet with sticky stinky cider and yeast! - so for each 20-25lb batch, store the final litre of juice in a plastic bottle for a week until the initial ferment has settled, then add this, skimming off any of the scum that rises out of the demi-john when you top it up with the held-back juice.
Full recipe and instructions:-
1)Juice! - we use a Dualit juicer which takes about 20 minutes to juice 20lb of apples. having to stop every 5lb or so to clear the hood of debris and empty the bucket.
we don't use the silly little jug that comes with it that takes the juice of 3 apples...we direct the spout out into a 3litre steel pan to can carry on juicing longer.
the juice is then strained through a fine sieve into a big 25litre pan to clear the bulk of the sediment, etc.

2)"sterilise" to kill off natural yeasts.
There are 3 chains of thought....I've tried all three, and get the most consistent results this way.
Chain A) don't do anything with it...just demi-john it, lob in some extra yeast, and "see what happens". you will definitely get cider...you just might get a bit hit or miss as to the quality of the natural yeasts you encounter, and increases the likelyhood of a bacteria incidence in the brew too which will acetify it and make it turn to vinegar whilst it's maturing.
Chain B) use a chemical "campden tablet" - which is essentially sulphur dioxide - to kill bacteria and the natural yeats. before then adding your own yeast. I don't really like this, I think it alters the taste.
Chain C) (the one we use) - I quickly bring the apple juice up to 70 degrees to kill off all the natural yeast, and any bacteria, then quickly cool the pan in a sink of cold water, back down to 37 degrees.
This way, you have a sterile juice, you can control the brewing of, and it's also now at the perfect temp to begin fermenting.

3)demi-john and ferment
once sterile and ready to demi-john. we add yeast nutrient and pectolase (to dissolve out the pectin which can cause cloudy cider), then add some juice, then add the sachet of wine yeast, then top up with juice. top up to 4/5th's and add an airlock.
keep in a steady temp place (spare room, etc) and leave to ferment.
should take about 1 week before the initial brew finishes and settles. you can then top it up to 7/8th's (leave a little breathing room) and re-seal. leave it for another couple of weeks to re-ferment and settle.
at this point you have two choices...you can leave it in the demi-john to mature, or bottle it and leave it to mature in the bottles. we use the latter method.
4)Bottle it
make sure you heat sterilise the syphon and bottles well before use, syphon the cider out into the bottles.
if you want "flat" cider, any bottles will do. if you want naturally sparkling cider, then use "grolsch" type bottles (i.e. sprung loaded, pressurisable ones) and before you add the cider, add either a good table spoon of sugar (to reactivate the yeast and create sealed CO2 which dissolves in th cider creating sparkling cider), or even add a shot of your favourite fruit cordial...we use blackberry cordial - to make perfect pre-mixed sparkling fruit flavoured ciders.
seal these and leave to re-ferment in a cool place - I reckon given them at least another month to mature. chill well, open carefully!
depending on the yeast you used, you should get between 8% and 14% ABV - we get about 12% so if it's left to mature and clear for a few months it taste more like champagne than it does cider!
Someone on twitter asked about how many apples for how much juice for how much cider.

Full recipe and instructions:-
1)Juice! - we use a Dualit juicer which takes about 20 minutes to juice 20lb of apples. having to stop every 5lb or so to clear the hood of debris and empty the bucket.
we don't use the silly little jug that comes with it that takes the juice of 3 apples...we direct the spout out into a 3litre steel pan to can carry on juicing longer.
the juice is then strained through a fine sieve into a big 25litre pan to clear the bulk of the sediment, etc.

2)"sterilise" to kill off natural yeasts.
There are 3 chains of thought....I've tried all three, and get the most consistent results this way.
Chain A) don't do anything with it...just demi-john it, lob in some extra yeast, and "see what happens". you will definitely get cider...you just might get a bit hit or miss as to the quality of the natural yeasts you encounter, and increases the likelyhood of a bacteria incidence in the brew too which will acetify it and make it turn to vinegar whilst it's maturing.
Chain B) use a chemical "campden tablet" - which is essentially sulphur dioxide - to kill bacteria and the natural yeats. before then adding your own yeast. I don't really like this, I think it alters the taste.
Chain C) (the one we use) - I quickly bring the apple juice up to 70 degrees to kill off all the natural yeast, and any bacteria, then quickly cool the pan in a sink of cold water, back down to 37 degrees.
This way, you have a sterile juice, you can control the brewing of, and it's also now at the perfect temp to begin fermenting.

3)demi-john and ferment
once sterile and ready to demi-john. we add yeast nutrient and pectolase (to dissolve out the pectin which can cause cloudy cider), then add some juice, then add the sachet of wine yeast, then top up with juice. top up to 4/5th's and add an airlock.
keep in a steady temp place (spare room, etc) and leave to ferment.
should take about 1 week before the initial brew finishes and settles. you can then top it up to 7/8th's (leave a little breathing room) and re-seal. leave it for another couple of weeks to re-ferment and settle.
at this point you have two choices...you can leave it in the demi-john to mature, or bottle it and leave it to mature in the bottles. we use the latter method.
4)Bottle it
make sure you heat sterilise the syphon and bottles well before use, syphon the cider out into the bottles.
if you want "flat" cider, any bottles will do. if you want naturally sparkling cider, then use "grolsch" type bottles (i.e. sprung loaded, pressurisable ones) and before you add the cider, add either a good table spoon of sugar (to reactivate the yeast and create sealed CO2 which dissolves in th cider creating sparkling cider), or even add a shot of your favourite fruit cordial...we use blackberry cordial - to make perfect pre-mixed sparkling fruit flavoured ciders.
seal these and leave to re-ferment in a cool place - I reckon given them at least another month to mature. chill well, open carefully!
depending on the yeast you used, you should get between 8% and 14% ABV - we get about 12% so if it's left to mature and clear for a few months it taste more like champagne than it does cider!

Saturday, 27 October 2012
autumnal flavours...
What better to do with windfall pears before they go overripe.
they never seem to store as well as apples do, so thought i'd try bottling some this season.
Recipe (for 8 pears, 2x 1pint kilner jars)
If you followed my blackberry cordial receipt earlier, and made some blackberry wine then you'll have the two main additions.
300ml of neat blackberry cordial/syrup
300ml of blackberry wine
depending on how tightly you pack your pears you may not need all the liqour but make a little extra incase.
tea-spoon of chopped preserved stem ginger (the sweet sticky sugar'd stuff)
boil these together whilst you peel, quarter, and core the pears
place the pear quarters in the sterilised jars
pour over the boiling liquor
seal them
for a longer keep, place in a ban-marie, or large saucepan, and bring the sealed jars to the boil for a few minutes. then let them cool.


Saturday, 15 September 2012
Forager's Chutney....
Time to get the pans out tomorrow and knock up some foragers chutney.
basic recipe
1 pint of vinegar (we use mixture of 50% cider, 40% cheap balsamic - not the decent 4 leaf stuff, 10% white wine, vinegars)
1-1.5kg of "fruit" chopped, peeled apples (any type will do..whatever you find), and maybe any plums or gage's chopped and stoned
1-1.5kg of "veg" - we use onions, garlic, carrots, celariac, maybe swede, the odd green tomato this late in the season (whatever the garden has too much of, chopped as chunky as you like your chutney)
500g of sugar
throw it all in as big a pan as you need to, and boil and stir until it's got no free juice/liquid flowing, and thick enough for you to run a spoon through it and see the bottom of the pan for a second before it closes back in. - should take about an hour or so of cooking
sterilise some jars, bottle it super hot, straight from the heat, and seal.
photo's to follow...
Sunday, 2 September 2012
Cooking with Blackberry wine, and Wild Herbs
Now if you've been keeping up with the Blackberry season, you'll know we laid down a few bottles of Blackberry wine a few weeks ago.
http://foragersnook.blogspot.co.uk/2012/08/blackberry-wine.html
We always keep a "taster bottle" to see how the batch is getting on, and having tried it after 3 weeks, I can confirm it's now like a sweet and sprightly french beaujolais - i.e. fresh, fruity and light on tannins.
Today's wander took us along the cliffs of Dover from St Margarets back towards Dover to the National Trust centre above the Port of Dover - along the "Saxon Shore Way"
(The Cafe at the Dover National Trust cliff top centre is a splendid place for a mid-walk cup of tea and a scone)
All along this sun drenched cliff top are patches of wild marjoram/oregano
as well as big specimens of sea beets, ready for next spring (they'll be a bit tough and stringy by now)


And what better to do than mix the two...
so today's recipe is a wonderful lamb-shank, pot braised in blackberry wine, with wild oregano.
(Wine, stock cube, carrot, celery, onion, garlic, tomatoes, mustard, worcestershire sauce, wild herbs, - 3 hrs slow braise at 180 degrees)
sweet, succulent, and delicious, served with home grown new potatoes.

And also...watch out out for wonderful butterflies feasting on the thistles, scabies, and the oregano flowers.

Sunday, 19 August 2012
Blackberry Jam....
Now.....not sure if this is a soft set...or a hard set....I guess you'll have to re-visit this in a few hours to see how it turned out.
___________________________________________
Today's recipe - Blackberry Jam (seeds left in...perfer a bit of texture, rather than a smooth jelly)
(at this point, if you want to make a smooth seedless jelly rather than a jam - then you can rub through a fine sieve or leave to drip through muslin overnight, to get just the juice and use this instead....there are recipes (try Pam Corbin) for this)
without boiling, stir in the sugar and lemon juice, and make sure it all dissolves.
Do a taste test at this point too. there are 2000 different varieties of blackberries and they all taste slightly differently.
This batch was made from the first flush of big juicy ones from a south facing hedge of brambles, so didn't need any more sweetening and they were even sweet to eat raw.
If you like it a bit more tart, adjust the sugar accordingly, but you may need to add some more pectin (throw in a chopped cooking apple, or powdered pectin as required)
If you like it sweeter, add more normal sugar, the pectin sugar will do it's bit, don't need to add more.
once you're happy with it, then turn the heat up, put a long sleeve top and gloves on to stop boiling jam from spitting all over your skin, stir continuously to stop it sticking and burning.
once it's on a full boil, then it should take about 4 minutes of boiling to reach the setting point.
if you want to stick a thermometer in to test it feel free, 104 degrees C is what you need to aim for, or just go by the feel of it, you notice it thickening once the setting point is reached, and have a chilled plate at the ready to test a blob of it on for setting.
remember it continues to set further as it cools...so it will always feel a little looser at jaring stage then it will actually turn out.
as soon as your happy with it, funnel it into pre-heated/sterilised jars, lid, and seal.
essentially...as long as you have enough pectin, and as long as you boil for 4 minutes, it will set to something between a soft set jelly, and a fully set jam - as the berries will always be slightly different each time, you'll rarely get the same result twice....but that's surely the fun of foraged produce.

Tj@TheForagersNook
___________________________________________
Today's recipe - Blackberry Jam (seeds left in...perfer a bit of texture, rather than a smooth jelly)
- 1 Kg of blackberries (picked last week, and frozen - so i just defrosted them on the hob and cooekd them to a pulp)
- 1Kg of Jam Sugar (the silverspoon stuff with added pectin)
- Lemon Juice
(at this point, if you want to make a smooth seedless jelly rather than a jam - then you can rub through a fine sieve or leave to drip through muslin overnight, to get just the juice and use this instead....there are recipes (try Pam Corbin) for this)
without boiling, stir in the sugar and lemon juice, and make sure it all dissolves.
Do a taste test at this point too. there are 2000 different varieties of blackberries and they all taste slightly differently.
This batch was made from the first flush of big juicy ones from a south facing hedge of brambles, so didn't need any more sweetening and they were even sweet to eat raw.
If you like it a bit more tart, adjust the sugar accordingly, but you may need to add some more pectin (throw in a chopped cooking apple, or powdered pectin as required)
If you like it sweeter, add more normal sugar, the pectin sugar will do it's bit, don't need to add more.
once you're happy with it, then turn the heat up, put a long sleeve top and gloves on to stop boiling jam from spitting all over your skin, stir continuously to stop it sticking and burning.
once it's on a full boil, then it should take about 4 minutes of boiling to reach the setting point.
if you want to stick a thermometer in to test it feel free, 104 degrees C is what you need to aim for, or just go by the feel of it, you notice it thickening once the setting point is reached, and have a chilled plate at the ready to test a blob of it on for setting.
remember it continues to set further as it cools...so it will always feel a little looser at jaring stage then it will actually turn out.
as soon as your happy with it, funnel it into pre-heated/sterilised jars, lid, and seal.
essentially...as long as you have enough pectin, and as long as you boil for 4 minutes, it will set to something between a soft set jelly, and a fully set jam - as the berries will always be slightly different each time, you'll rarely get the same result twice....but that's surely the fun of foraged produce.

Tj@TheForagersNook
Saturday, 18 August 2012
blackberry wine...
Having now picked about 10lbs of blackberries from our old favourite spot, and now a new favourite spot on the Greensands Way, we've put down our first batch of blackberry wine.


For the recipe we used, you will need:-
- 4lb of fresh juicy blackberries (you can freeze them first so that when they thaw you get more juice out of them more easily)
- 3lb of sugar
- a big bucket to steep them in
- a packet of wine yeast
- 4 litres of water
- juice of a lemon
Instructions:-
place the blackberries in the bucket, and mush them with a potato masher
Add a litre of boiling water to the mush to help release the fruit juices from the pulp,
Add the sugar to the mush, the boiling water will help to dissolve the sugar
in a seperate bowl, mix 3 litres of cold water, the yeast, and the juice of the lemon
stir all together, put a lid on (or cover with a clean towel), and leave it to steep for three days in a warm place

On Day 4 - be prepared for the most wonderful alcohol heady aroma to be released from the bucket when you take the lid off!
strain the liquor from the bucket through a sterilised muslin/fine seive and then pour the strained liquor into a 4.5litre demi-john
now...when we did this, we ended up with about 6 litres of juice as the berries were so juicy....so I guess you could use a bit less water, if you want a stronger wine, or a bit less blackberry if you want a lighter wine.

With the extra juice, I've bottled it in a pressure bottle, to make a side batch of early sparkling blackberry fizz (I'll release the pressure every few days to stop the bottles exploding)
put an airlock/bung on the demi-john, and leave in a dark corner until it stops fermenting - this could be anything from a week to a month.
what you do with it next is yours to decide.
If you want a more complex wine - then leave it "on it's leas" - i.e. in the demijohn with all the yeasty slurry for a few month before syphoning off and bottling.
If you want a quick and fruity wine - then syphon it off into bottles as soon as it stops fermenting
...and don't forget, if you want to add your own fizz to it when you syphon it off and bottle it, then drop half a tea-spoon of sugar into each bottle when bottling (but if you're going to do this, make sure they are swing topped pressure capable bottles....and make sure you release them slowly when you do drink them to release the pressure slowly (like you should with champagne)
Subscribe to:
Posts (Atom)